Wiki: How to billing in service desk according to assets and organization

The billing feature in the service desk helps you to easily manage the cost for the services you provide to your clients. You can define unique service plans by creating customized service contracts for the organization. This provides an accurate and automatic billing system.

To set the billing system you should set some billing related option in the following modules,

1.Assets

2.Contracts

3.Ticket Settings & Options

4.Reports

Assets:

For every service provided to the clients, the administrators can set the global rate.These global rates will vary for the assets.The billable amount will be added to either weekly or monthly bill.

Steps to create asset and set global rate to that asset:

In default there will be some assets available, the global rates to those assets can be edited.

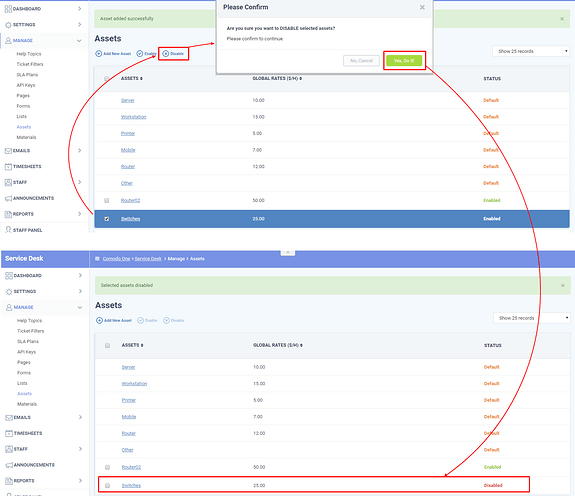
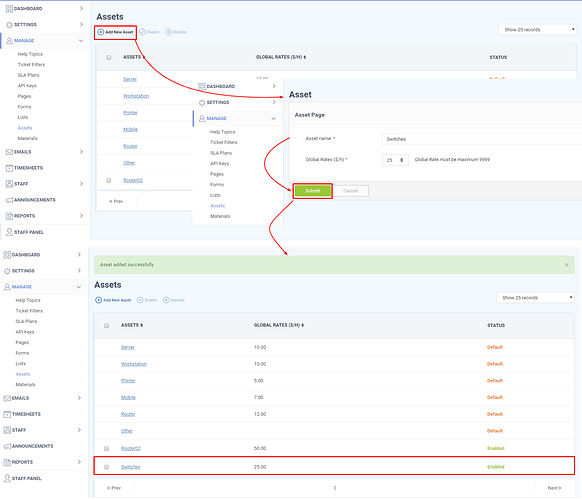
STEP [1]: Go to Service desk →Admin Panel ->Manage -> Assets. The Default assets and custom alerts will be loaded.

STEP [2]: To add a new asset click “Add New Asset” , Asset Page loads.Give the Asset name and Global rates and click save button. A new asset will be added with the status “enabled”.

  • Asset name - Name of the Asset.
  • Global rates - Give the rate that need be charged for the service.
  • Status - Defines the status of the asset .There are three type of status “Default”, “Enabled ”, “Disabled ”.

1.The asset with status “default” cannot be disabled.
2. The custom assets can be either “Enabled ” or “Disabled”

Contracts:

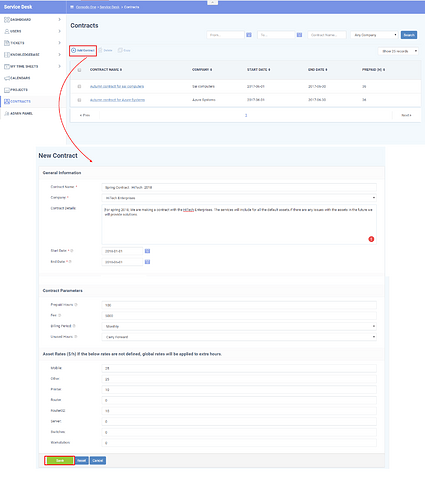
The services provided to the customer organization can be managed by creating a contract.The contracts can be customized based on the customer and your needs.You can define billing period, rates to the asset, Prepaid hours, unused can be carried forward or not etc.

Create a new Contract:

The create new contract form has three subsections, they are the following.

1.General Information: Provide the general information such as

    1.Contract Name - Give a name for the contract.
    2.Company - Select the organization from the drop down for which the contract needed to be created.
    3.Contract Details - Enter a brief explanation about the contract.

2.Start Date - Enter the commencement date of the contract.

3.End Date - Enter the end date of the contract.

2.Contract Parameters: The parameters such as

    1.Prepaid Hours - The prepaid hours will not be nonbillable hours. This is an optional option.Once the prepaid hours gets over the time.
    2.Fee - The fee that needed to paid by the organization.If the Fee is defined as 0, the organization no need to pay the amount the fee.
    3.Billing Period - Define the billing period. If billing period = monthly, the organization should pay the fee for every month till the contract ends.
    4.Unused Hours - The unused hours within the billing period can either be carried forward or it cannot.

3.Asset Rates ($/h) If the below rates are not defined, global rates will be applied to extra hours:

Define the rate for each asset. It will be used in the billing.If the asset rate is not defined or set as 0 after the Prepaid Hours, the global rate will be applied.

Note: If the rate is provided for the asset in the contract. It will be used for the billing otherwise the global rate (defined in the contracts )will be used for billing purposes.

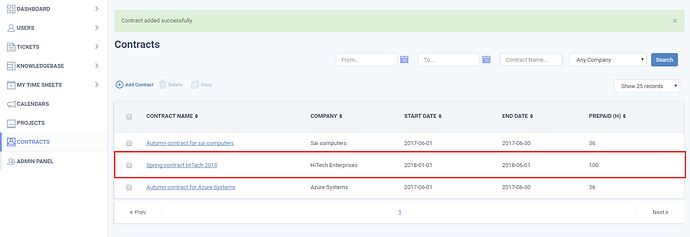
Fill the necessary details for the contract and click create.
Ticket Settings & Options:

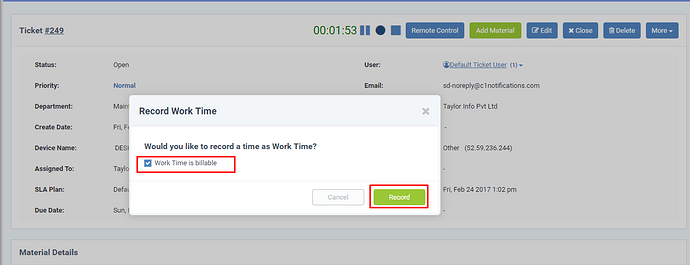
The time spent by the staff on the ticket can be made billable by setting the following two options in the “Ticket Settings & Options”

1.Work Time is Billable - The time spent on the ticket can be set as either billable or not billable

2.Round billable time - Select the round off option for the billable time.

Steps:

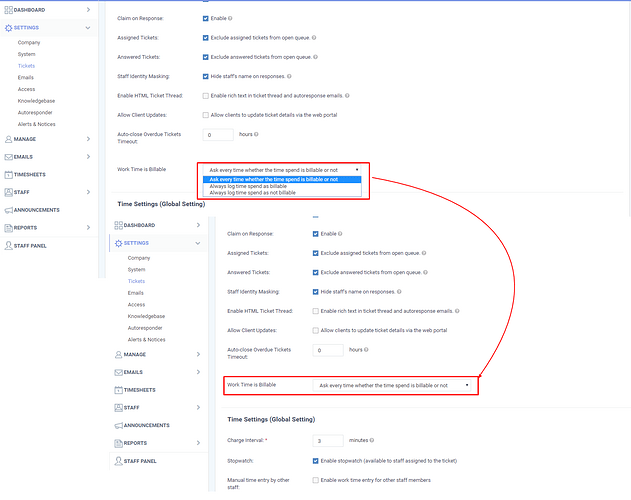
Step [1]: Goto Service Desk ->Admin Panel->Setting->Tickets.The “Ticket Settings & Options” page will be loaded.This page helps you to configure the setting for the tickets which are raised by the end user and the staff.

Step [2]: As mentioned earlier, the billable timing dealt with the tickets can be set here.In “System-wide default ticket settings and options”, the “Work Time is Billable” can be set using three option.

1.Ask every time whether the time spent is billable or not - Ask the staff to add their time in the tickets they have handled as a billable or not.
2.Always log time spent as billable - The time spent in the tickets are billable.
3.Always log time spent as not billable -The time spent in the tickets are not billable.

Example: If you want to ask the staff to charge their service time as billable or not.
Enable "Ask every time whether the time spent is billable or not " this option.

Step [3]: The billable time will be calculated based on the Time setting.

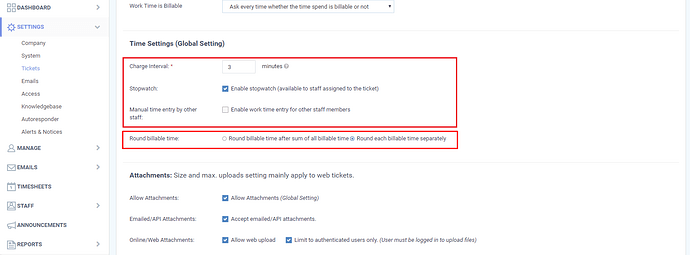
  1. Charge Interval - The change interval determines the rounding off billable time.
    For example, the “change interval” is set to 3 minutes, and if the billable time spent by staff records as 1.45. It will round off the recorded billable time from 1.45 to 3 minutes.

  2. Stopwatch - If this option is enabled, the automatic stopwatch timer will be displayed while working on the ticket.The staff can record his timing using the record icon.

  3. Manual time entry by other staff - If this option is enabled, the staff other than who working on the ticket can log their work.

  1. Round billable time - The “Round billable time”, allows you to set the rounding off billable time of the ticket.

There are two choices available.

    1.Round billable time after sum of all billable time - If enabled, the billable time will be l round off after summing up all the time.

    2.Round each billable time separately - If enabled, when you record the billable time, the time spent will rounded off and saved.

Please refer below illustration which has
charge interval - 3 minutes

stop watch - Enabled

Manual time entry by other staff - Not Enabled

Round Billable time - Round Each billable time separately

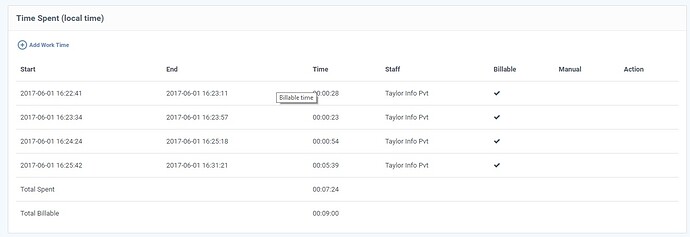
For example : The billable time is recorded when with option enabled “Round billable time after sum of all billable time”

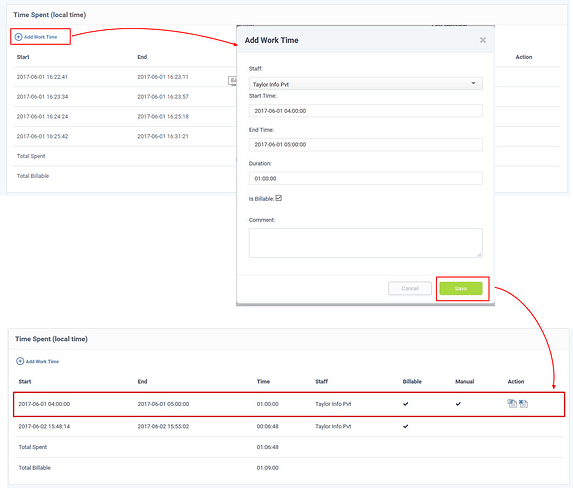
If the stop watch is not enabled, the staff can manually log their work through "Add Work Time " option in the Time Spent .

Please refer the illustration

Once the Contracts is made, the services that fall within the “Prepaid Hours” will not be added considered the billable.If the time exceeds the “Prepaid Hours”. the billable charges will be applied to services provided based upon the rates mentioned in the contract and also based on the other factors defined in the contract.

For the non- contract services, the billing will be applied based on the global rates.

Reports:

The Reports component helps to generate a report for different context.

The cost for the billable time recorded can be generated for separate organisation or all organisation.

Steps:

Step [1]: Go to Admin Panel → Reports → Costs.The Reports form will be loaded.

Under cost Section, give “Period From”,“To” and “organisation” and click Go

For Example:

Period From : 2017-06-01

To :2017-06-02

Organization: Taylor Info Pvt Ltd

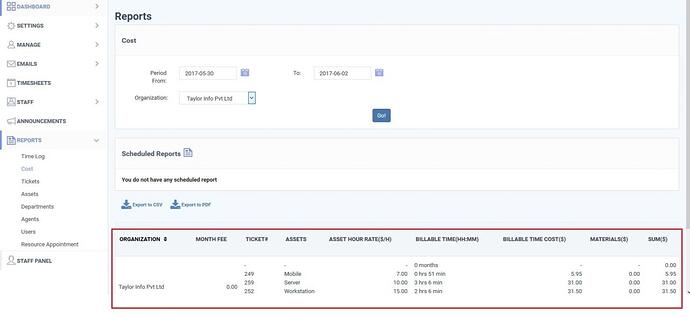
The cost report for will be as below

Organisation : The name of the organisation to which ticket belong.

Monthly Fee : The Monthly fee details which are provided in the contract will be displayed here. In this case monthly fee is zero because the contract has not commenced yet for this organisation.

Tickets : The handled Ticket related to the organisation will be listed here.

Assets : The Assets which are handled in the ticket will be listed here.

Asset rate per hour : The amount set for an asset will be listed here. It depends on the global rate or the rate defined in the contract.

Billable Time : The billable time spent on the ticket.If there are predefined hours the time spend on the ticket will not added to this list till the time exceeds.

Billable time cost : Cost of the billable time

Material : The cost of the material used to resolve the tickets.

Sum : Sum of the Billable and Material cost.

This report can be imported either in Export to PDF or Export to CSV.

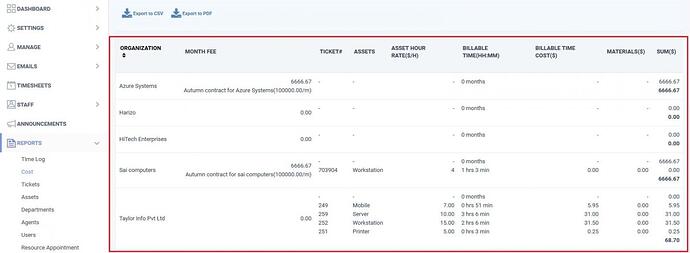
Example :Report includes all the Organisation.